Friday, May 20, 2011

Blueberry Jam


The current Cookbook Challenge theme is Blue. I'm absolutely obsessed with blueberries, so of course I chose a blueberry recipe. They're not quite in season yet (I think that happens next month) so fresh blueberries are really expensive right now, so I found this recipe that works well with fresh or frozen berries. It's from the July 2004 issue of Cooking Light (yes, magazines are allowed in the Cookbook Challenge!), which I recently got at a library that seemed to be getting rid of all of their old issues of the magazine. How could I not take home this issue with a cover photo like this one?

The recipe is originally from the Wildflower Inn in Searsport, Maine.

Note: This jam is stored in the refrigerator, so you don't need to can it!

5 cups fresh or frozen, thawed, blueberries
5 1/4 cups sugar
2/3 cup fresh orange juice (about 3 oranges)
1 tbsp fresh lemon juice
1/4 tsp salt
1 (6-ounce) package liquid fruit pectin (such as CERTO)
Place the blueberries in a large saucepan, and crush with a potato masher.
Add sugar, juices, and salt; stir well to combine.
Let blueberry mixture stand for 30 minutes.
Bring mixture to a boil over medium heat; cook 1 minute, stirring constantly. Remove from heat and add pectin, stirring until well-blended.
Pour jam into jars or air-tight containers.

Cool completely; cover and refrigerate for up to 4 weeks. Yield: 7 cups.
 My jam didn't thicken very well, so I guess I did something wrong, but I'm not sure what. It's really good, though, and I especially enjoyed whipping it together with some mascarpone cheese and filling crepes with the mixture. I plan to make some lemon ice cream soon, and I think it will make a very good topping!


Saturday, May 7, 2011

Savory Biscotti


I'm posting this a day late, but the last Cookbook Challenge theme was Crunchy. This one wasn't quite as easy as you would expect! It's hard to find a recipe in a cookbook based on the crunchiness, because they certainly don't list anything in the index under "Crunchy". So I had to think of food that was definitely crunchy, and I remembered this recipe I had seen in the Best of Weight Watchers Magazine cookbook for savory biscotti. They didn't turn out quite as crunchy as I thought they would, but they were yummy!

2 tbsp olive oil
1 tbsp unsalted butter, melted
3 garlic cloves, finely chopped
2 tsp fennel seeds, crushed
1/2 tsp curry powder
2 cups all-purpose flour
2 tbsp yellow cornmeal
1 1/2 tsp baking powder
2 tsp sugar
1 tsp salt
1/4 tsp cayenne
2 egg whites
1 large egg

Note 1: I'm assuming that because this is a Weight Watchers recipe, they replaced 1 egg with 2 egg whites to save calories. So you don't need to use 2 egg whites and 1 egg if it's too much trouble, you can just use 2 whole eggs.
Note 2: Three cloves of garlic may seem like a lot, but the fennel balances it out!
Note 3 (from the cookbook): To crush the fennel seeds, place them on a piece of wax paper, fold over some of the paper to cover, and then press down with a rolling pin.

Preheat the oven to 350F.
Stir the oil, butter, garlic, fennel seeds, and curry powder in a medium microwavable bowl. Microwave on High until aromatic, 10-35 seconds. Let cool.
Whisk the flour, cornmeal, baking powder, sugar, salt, and cayenne in a large bowl.
Whisk the egg whites and egg into the butter mixture; stir into the flour mixture with a wooden spoon until a stiff dough forms.
On a lightly floured surface, roll dough into two 12-inch logs and place 2 inches apart on an ungreased baking sheet.
 Bake until light golden and firm to the touch, about 25 minutes. Let cool completely. With a serrated knife, slice the logs on a slight angle 1/4-inch thick.
 Arrange the slices flat on the baking sheet. Bake 5-6 minutes, turn, and bake until light golden on both sides, 5-6 minutes more.


Friday, April 29, 2011

Tres Leches Cake

"Tres leches" is Spanish for "three milks", and tres leches cake is a Mexican cake that is soaked in three kinds of milk/cream: evaporated milk, sweetened condensed milk, and heavy cream (although some recipes replace the heavy cream with whole milk). If the idea of a slightly soggy cake sounds disgusting to you, just think about the times you've had cake and ice cream together, and how good the cake is when the ice cream melts into it. Tres leches cake is quite similar, except that it's even more moist.

It was very difficult for me to find a recipe for this. I own dozens of cookbooks, but most of them don't have very many Mexican recipes in them. I have one cookbook that is entirely Mexican recipes, but tres leches cake was not included. So I had to search through cookbooks at libraries to find the perfect recipe. I finally found what I was looking for in Fresh Mexico by Marcela Valladolid.

This recipe says to use a 10-inch cake pan with 2-inch sides, and I only have 9-inch cake pans with 1.5-inch sides, so I had some batter left over. Even with leaving out a lot of the batter, the cake expanded more than I thought it would and spilled over a little bit, so I would suggest placing the cake pan on a baking sheet. I would do this even if I had the correct size pan just to be on the safe side.

I also didn't own any platters that had 1-inch high sides, so I just squeezed the cake into a 9x13 baking dish, which worked wonderfully.

Unsalted butter, for the pan
 1 1/2 cups all-purpose flour, plus more for the pan
1 tbsp baking powder
1 tsp ground cinnamon
4 large eggs, separated
1 1/2 cups sugar
1/2 cup milk
One 14-oz. can sweetened condensed milk
One 12-oz. can evaporated milk
1 cup heavy cream
1 tbsp orange liqueur, such as Grand Marnier (I replaced this with about 1/2 tsp orange extract)

Preheat the oven to 350F. Butter and flour a 10-inch cake pan with 2-inch-high sides, and then line the bottom with parchment paper. Butter the paper.
Mix the flour, baking powder, and cinnamon in a medium bowl.
Using an electric mixer, whip the egg whites until frothy. With the mixer running, gradually add the sugar and beat until stiff peaks form. (I could NOT get this to stiffen, even after completely starting over, probably due to so much sugar being added. I decided to not worry about it, especially since it would collapse anyway after adding the other ingredients.)
Beat in the egg yolks, one at a time, blending well after each addition. Add the flour mixture in three additions, alternating with the whole milk in two additions.

Pour the batter into the prepared pan and bake for 30 minutes, or until a tester inserted into the center comes out clean. Let the cake cool slightly in the pan; then invert it onto a platter with 1-inch-high sides.
Pierce the top of the warm cake all over with a thick skewer.
Mix the sweetened condensed milk, evaporated milk, heavy cream, and orange liqueur (or orange extract), and pour over the cake.

Cover and refrigerate until cold, about 3 hours, or overnight.
Serve as is or top with whipped cream and/or fruit, if desired.
If you have never tried tres leches cake before, prepare to fall in love.

Thursday, April 21, 2011

Dark Chocolate Soufflé


This fortnight's Cookbook Challenge theme is Eggs. I wanted to make an egg-based dessert and I wanted to try a dish that I had never attempted before, so I went with a soufflé. This recipe is from Hershey's Chocolate Lovers Cookbook, published in 1993. It says to use a 6-cup soufflé dish, which of course I didn't have. I went many places trying to find one, with no luck. In one store I did find some for $10 and I wasn't even sure if they were big enough. So I decided that I would just make individual soufflés and use coffee mugs instead of soufflé dishes or ramekins. And they worked very well!

1 tbsp sugar
1/2 cup dutch cocoa (or European-Style)
1/4 cup all-purpose flour
1/4 cup (1/2 stick) butter, softened
1 cup milk
1/2 cup plus 2 tbsp sugar, divided
1 tsp vanilla
4 eggs, separated

Heat oven to 350F. Butter 6-cup soufflé dish (or mugs); coat with 1 tablespoon sugar. In medium bowl, combine cocoa and flour. Add butter; blend well. Set aside. In medium saucepan, heat milk until very hot. Reduce heat; add cocoa mixture, beating with wire whisk until smooth and thick.

Remove from heat; stir in 1/2 cup sugar and vanilla. Cool slightly. Add egg yolks, one at a time, beating well after each addition. Cool to room temperature.

In large mixer bowl, beat egg whites until foamy; gradually add remaining 2 tablespoons sugar and continue beating until stiff.

Stir small amount beaten whites into chocolate mixture; fold chocolate mixture into remaining whites.


Carefully pour into prepared dish. Bake 40 to 45 minutes until puffed (or if making individual soufflés, bake 20 to 25 minutes). 

They start to deflate very quickly!

 
The cookbook suggests serving with vanilla ice cream, but I thought they went perfectly with whipped cream.

Monday, April 11, 2011

Garden Bunnies


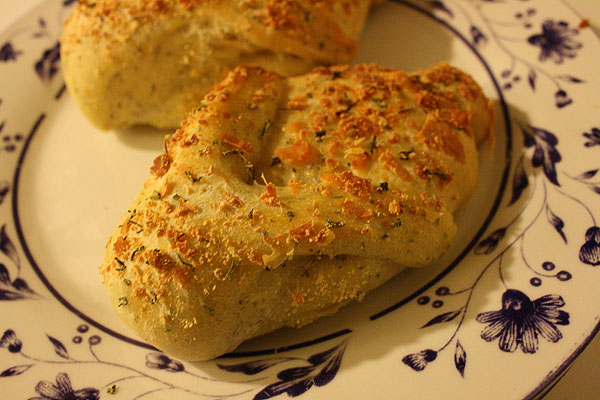
 I'm a couple days late, so the just past Cookbook Challenge theme was Celebration. I chose this recipe for Garden Bunnies from my Better Homes & Gardens Classic Recipes cookbook as a celebration of Spring. They can also be used to celebrate Easter, obviously.

I made the mistake of using a rather old envelope of yeast, so my Garden Bunnies didn't rise very well and turned out a little dense. They tasted very good, though, and were easier to make than I thought they would be!

5 1/2 to 6 cups all-purpose flour
1 pkg. active dry yeast
2 1/4 cups milk or buttermilk
1/4 cup mixed snipped fresh herbs such as sage, rosemary, parsley, and thyme; or 3 to 4 tsp. dried herbs, crushed
2 tbsp sugar
1 tbsp butter
1 1/2 tsp salt
1 recipe Sugar-Sage Topping or Rosemary-Cheese Topping (below)
1 egg white
1 tbsp water

Note: Rosemary and sage are strong-flavored herbs. If using them alone, add only 2 tablespoons fresh or 2 teaspoons dried.

Sugar-Sage Topping: In a small bowl stir together 1/3 cup fine sanding sugar or granulated sugar and 1 tablespoon finely snipped fresh sage.
Rosemary-Cheese Topping: In a small bowl stir together 1/3 cup grated Parmesan cheese and 1 tablespoon fine snipped fresh rosemary.

1. In a large mixing bowl combine 2 1/2 cups of the flour and the yeast; set aside. In a medium saucepan heat and stir milk, herbs, sugar, butter, and salt just until warm (120F to 130F) and butter almost melts.

Add milk mixture to flour mixture. Beat with an electric mixer on low to medium speed for 30 seconds, scraping sides of bowl constantly. Beat on high speed for 3 minutes.

Using a wooden spoon, stir in as much of the remaining flour as you can.
2. Turn dough out onto a lightly floured surface. Knead in enough of the remaining flour to make a moderately stiff dough that is smooth and elastic (6 to 8 minutes). Shape into a ball. Place in a lightly greased bowl; turn once to grease surface.
 Cover; let rise in a warm place until double (45 to 60 minutes).
3. Punch dough down; turn out onto a lightly floured surface. Divide in half; cover and let rest for 10 minutes. Meanwhile, lightly grease a baking sheet; set aside.
4. To form bunnies, roll a portion of dough into an 8-inch circle. With a sharp knife, cut into 6 wedges.
 From 4 wedges, snip a small amount of dough to make tails for bunnies. Gently shape the 4 wedges into ovals by pulling edges under and pinching together. Place ovals, pinched side down, on prepared baking sheet. Flatten slightly to 4 inches long.
 5. Form snipped pieces of dough into tails; press onto one end of dough ovals. To make heads and ears, divide the remaining 2 wedges in half, making 4 small wedges total. Shape each wedge into a teardrop shape, about 4 inches long. With kitchen shears, cut into the pointed end of each, making cuts about 2 1/2 inches long. Lay each set of ears on top of an oval shape, near end opposite tail. If necessary, brush with water to help dough stick together. Gently give the ears a half twist so the cut edge is facing up.
6. Repeat rolling and shaping with the other portion of dough.
Cover and let rise in a warm place until nearly double in size (about 30 minutes).
7. Preheat oven to 350F. Prepare Sugar-Sage Topping or Rosemary-Cheese Topping; set toppings aside. In a small bowl beat together egg white and water. Brush bunnies with egg mixture. Sprinkle (or rub) with topping. Bake for 15 to 20 minutes or until done, covering with foil the last half of baking to prevent overbrowning. Serve warm. Makes 8 bunnies.

Tuesday, March 22, 2011

Lemon Cloud Pie

  
The current CookBook Challenge theme is American. I decided to do a recipe from Pillsbury's Best of the Bake-Off Cookbook (published in 1996), because the Pillsbury Bake-Off Contest is such a classic American event. This recipe for lemon cloud pie was a prize winner in the 11th Bake-Off in 1959 and was submitted by Shirley Ordiway of Jamesville, New York. 

Before we get to the recipe, I need to complain about this:
 This happens every time I make a one-crust pie with refrigerated dough. Do I just need a pie pan with shorter sides, or am I doing something wrong? I follow the directions so carefully. And if I make a filled pie, it turns out perfect. Oh well, it's rustic, right?

Anyway....

1 refrigerated pie crust (from 15-oz. package)

FILLING:
1 cup sugar
3 tbsp cornstarch
1 cup water
1/3 cup lemon juice
2 egg yolks, slightly beaten
1/2 (8-oz.) package (4-oz.) cream cheese, cubed, softened
1 to 2 teaspoons grated lemon peel
1/2 cup whipping cream

TOPPING:
1/2 cup whipping cream, whipped (with powdered sugar to taste)

Heat oven to 450F. Prepare pie crust according to package directions for one-crust baked shell using a 9-inch pie pan. Bake at 450F for 9 to 11 minutes or until light golden brown. Cool completely.
 In medium saucepan, combine sugar and cornstarch; mix well. Stir in water, lemon juice, and egg yolks.
Cook over medium heat until mixture thickens and boils, stirring constantly. Boil 1 minute.
Add cream cheese and lemon peel, stirring until cream cheese is melted and mixture is smooth. Cool to room temperature.
In large bowl, beat 1/2 cup whipping cream until soft peaks form; fold into lemon mixture. Spoon filling mixture evenly into cooled baked shell. Cover surface with plastic wrap; refrigerate 6 to 8 hours or overnight. Spoon or pipe whipped cream over filling. Garnish as desired. Store in refrigerator.
 So fancy.


When I was making the filling for this, I thought it was going to turn out as a slightly creamier lemon meringue pie without the meringue. It actually turned out creamier and fluffier than I thought it would. It was delicious, and I will definitely be making it again.

Monday, March 7, 2011

Grilled Corn on the Cob with Orange-Basil Butter


The current Cookbook Challenge theme is Outdoors. I think it would have been neat to do a recipe that involved ingredients grown in my own garden, but it's much too early in the year for that, so I had to settle for an outdoor grilling recipe. Luckily, I had just gotten my husband a small gas grill for Christmas. Despite the cold, often rainy weather, we've been grilling things nearly every weekend. It's not just for Summertime! Since I'm mostly a vegetarian, I picked out a recipe that didn't involve grilling any meat. Not that I have a problem with cooking or working with meat, I just wanted to make something that I could eat.
This is from Best of Weight Watchers Magazine: Volume 1, published in 2002. I don't do Weight Watchers, but I came across this cookbook for very cheap at a thrift shop and it has a lot of good recipes, so I had to get it. If you do Weight Watchers, each ear of corn is 2 points (or 111 calories) if made with light butter.

4 ears fresh corn
2 tbsp light butter, softened
1 tsp grated orange rind
1/2 tsp balsamic vinegar
1/2 tsp sugar
1/2 tsp dried basil
1/2 tsp salt
freshly ground pepper, to taste

Spray the grill with nonstick spray; prepare the grill for a medium-hot fire. Husk the corn and remove any corn silk. Lightly spray the corn with nonstick spray and grill, turning occasionally, until tender, about 6 minutes.
No awesome grilling action shots, as it was too dark outside.

Meanwhile, combine the butter, orange rind, vinegar, sugar, basil, salt, and pepper in a small bowl.
 

Brush the grilled corn with the orange-basil butter and serve immediately.


These turned out really great! It was a flavor combination that I had never tried before, and I was pleasantly surprised by how well it worked.

If you don't have an orange or dried basil on hand, try lemon and thyme or cumin and cayenne!