Thursday, April 21, 2011

Dark Chocolate Soufflé


This fortnight's Cookbook Challenge theme is Eggs. I wanted to make an egg-based dessert and I wanted to try a dish that I had never attempted before, so I went with a soufflé. This recipe is from Hershey's Chocolate Lovers Cookbook, published in 1993. It says to use a 6-cup soufflé dish, which of course I didn't have. I went many places trying to find one, with no luck. In one store I did find some for $10 and I wasn't even sure if they were big enough. So I decided that I would just make individual soufflés and use coffee mugs instead of soufflé dishes or ramekins. And they worked very well!

1 tbsp sugar
1/2 cup dutch cocoa (or European-Style)
1/4 cup all-purpose flour
1/4 cup (1/2 stick) butter, softened
1 cup milk
1/2 cup plus 2 tbsp sugar, divided
1 tsp vanilla
4 eggs, separated

Heat oven to 350F. Butter 6-cup soufflé dish (or mugs); coat with 1 tablespoon sugar. In medium bowl, combine cocoa and flour. Add butter; blend well. Set aside. In medium saucepan, heat milk until very hot. Reduce heat; add cocoa mixture, beating with wire whisk until smooth and thick.

Remove from heat; stir in 1/2 cup sugar and vanilla. Cool slightly. Add egg yolks, one at a time, beating well after each addition. Cool to room temperature.

In large mixer bowl, beat egg whites until foamy; gradually add remaining 2 tablespoons sugar and continue beating until stiff.

Stir small amount beaten whites into chocolate mixture; fold chocolate mixture into remaining whites.


Carefully pour into prepared dish. Bake 40 to 45 minutes until puffed (or if making individual soufflés, bake 20 to 25 minutes)

They start to deflate very quickly!

 
The cookbook suggests serving with vanilla ice cream, but I thought they went perfectly with whipped cream.

Monday, April 11, 2011

Garden Bunnies


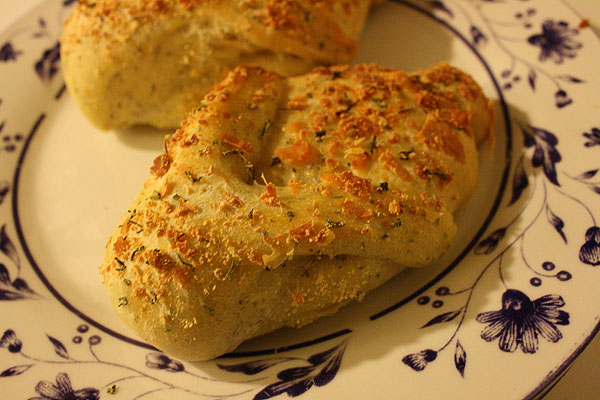
 I'm a couple days late, so the just past Cookbook Challenge theme was Celebration. I chose this recipe for Garden Bunnies from my Better Homes & Gardens Classic Recipes cookbook as a celebration of Spring. They can also be used to celebrate Easter, obviously.

I made the mistake of using a rather old envelope of yeast, so my Garden Bunnies didn't rise very well and turned out a little dense. They tasted very good, though, and were easier to make than I thought they would be!

5 1/2 to 6 cups all-purpose flour
1 pkg. active dry yeast
2 1/4 cups milk or buttermilk
1/4 cup mixed snipped fresh herbs such as sage, rosemary, parsley, and thyme; or 3 to 4 tsp. dried herbs, crushed
2 tbsp sugar
1 tbsp butter
1 1/2 tsp salt
1 recipe Sugar-Sage Topping or Rosemary-Cheese Topping (below)
1 egg white
1 tbsp water

Note: Rosemary and sage are strong-flavored herbs. If using them alone, add only 2 tablespoons fresh or 2 teaspoons dried.

Sugar-Sage Topping: In a small bowl stir together 1/3 cup fine sanding sugar or granulated sugar and 1 tablespoon finely snipped fresh sage.
Rosemary-Cheese Topping: In a small bowl stir together 1/3 cup grated Parmesan cheese and 1 tablespoon fine snipped fresh rosemary.

1. In a large mixing bowl combine 2 1/2 cups of the flour and the yeast; set aside. In a medium saucepan heat and stir milk, herbs, sugar, butter, and salt just until warm (120F to 130F) and butter almost melts.

Add milk mixture to flour mixture. Beat with an electric mixer on low to medium speed for 30 seconds, scraping sides of bowl constantly. Beat on high speed for 3 minutes.

Using a wooden spoon, stir in as much of the remaining flour as you can.
2. Turn dough out onto a lightly floured surface. Knead in enough of the remaining flour to make a moderately stiff dough that is smooth and elastic (6 to 8 minutes). Shape into a ball. Place in a lightly greased bowl; turn once to grease surface.
 Cover; let rise in a warm place until double (45 to 60 minutes).
3. Punch dough down; turn out onto a lightly floured surface. Divide in half; cover and let rest for 10 minutes. Meanwhile, lightly grease a baking sheet; set aside.
4. To form bunnies, roll a portion of dough into an 8-inch circle. With a sharp knife, cut into 6 wedges.
 From 4 wedges, snip a small amount of dough to make tails for bunnies. Gently shape the 4 wedges into ovals by pulling edges under and pinching together. Place ovals, pinched side down, on prepared baking sheet. Flatten slightly to 4 inches long.
 5. Form snipped pieces of dough into tails; press onto one end of dough ovals. To make heads and ears, divide the remaining 2 wedges in half, making 4 small wedges total. Shape each wedge into a teardrop shape, about 4 inches long. With kitchen shears, cut into the pointed end of each, making cuts about 2 1/2 inches long. Lay each set of ears on top of an oval shape, near end opposite tail. If necessary, brush with water to help dough stick together. Gently give the ears a half twist so the cut edge is facing up.
6. Repeat rolling and shaping with the other portion of dough.
Cover and let rise in a warm place until nearly double in size (about 30 minutes).
7. Preheat oven to 350F. Prepare Sugar-Sage Topping or Rosemary-Cheese Topping; set toppings aside. In a small bowl beat together egg white and water. Brush bunnies with egg mixture. Sprinkle (or rub) with topping. Bake for 15 to 20 minutes or until done, covering with foil the last half of baking to prevent overbrowning. Serve warm. Makes 8 bunnies.

Tuesday, March 22, 2011

Lemon Cloud Pie

  
The current CookBook Challenge theme is American. I decided to do a recipe from Pillsbury's Best of the Bake-Off Cookbook (published in 1996), because the Pillsbury Bake-Off Contest is such a classic American event. This recipe for lemon cloud pie was a prize winner in the 11th Bake-Off in 1959 and was submitted by Shirley Ordiway of Jamesville, New York. 

Before we get to the recipe, I need to complain about this:
 This happens every time I make a one-crust pie with refrigerated dough. Do I just need a pie pan with shorter sides, or am I doing something wrong? I follow the directions so carefully. And if I make a filled pie, it turns out perfect. Oh well, it's rustic, right?

Anyway....

1 refrigerated pie crust (from 15-oz. package)

FILLING:
1 cup sugar
3 tbsp cornstarch
1 cup water
1/3 cup lemon juice
2 egg yolks, slightly beaten
1/2 (8-oz.) package (4-oz.) cream cheese, cubed, softened
1 to 2 teaspoons grated lemon peel
1/2 cup whipping cream

TOPPING:
1/2 cup whipping cream, whipped (with powdered sugar to taste)

Heat oven to 450F. Prepare pie crust according to package directions for one-crust baked shell using a 9-inch pie pan. Bake at 450F for 9 to 11 minutes or until light golden brown. Cool completely.
 In medium saucepan, combine sugar and cornstarch; mix well. Stir in water, lemon juice, and egg yolks.
Cook over medium heat until mixture thickens and boils, stirring constantly. Boil 1 minute.
Add cream cheese and lemon peel, stirring until cream cheese is melted and mixture is smooth. Cool to room temperature.
In large bowl, beat 1/2 cup whipping cream until soft peaks form; fold into lemon mixture. Spoon filling mixture evenly into cooled baked shell. Cover surface with plastic wrap; refrigerate 6 to 8 hours or overnight. Spoon or pipe whipped cream over filling. Garnish as desired. Store in refrigerator.
 So fancy.


When I was making the filling for this, I thought it was going to turn out as a slightly creamier lemon meringue pie without the meringue. It actually turned out creamier and fluffier than I thought it would. It was delicious, and I will definitely be making it again.

Monday, March 7, 2011

Grilled Corn on the Cob with Orange-Basil Butter


The current Cookbook Challenge theme is Outdoors. I think it would have been neat to do a recipe that involved ingredients grown in my own garden, but it's much too early in the year for that, so I had to settle for an outdoor grilling recipe. Luckily, I had just gotten my husband a small gas grill for Christmas. Despite the cold, often rainy weather, we've been grilling things nearly every weekend. It's not just for Summertime! Since I'm mostly a vegetarian, I picked out a recipe that didn't involve grilling any meat. Not that I have a problem with cooking or working with meat, I just wanted to make something that I could eat.
This is from Best of Weight Watchers Magazine: Volume 1, published in 2002. I don't do Weight Watchers, but I came across this cookbook for very cheap at a thrift shop and it has a lot of good recipes, so I had to get it. If you do Weight Watchers, each ear of corn is 2 points (or 111 calories) if made with light butter.

4 ears fresh corn
2 tbsp light butter, softened
1 tsp grated orange rind
1/2 tsp balsamic vinegar
1/2 tsp sugar
1/2 tsp dried basil
1/2 tsp salt
freshly ground pepper, to taste

Spray the grill with nonstick spray; prepare the grill for a medium-hot fire. Husk the corn and remove any corn silk. Lightly spray the corn with nonstick spray and grill, turning occasionally, until tender, about 6 minutes.
No awesome grilling action shots, as it was too dark outside.

Meanwhile, combine the butter, orange rind, vinegar, sugar, basil, salt, and pepper in a small bowl.
 

Brush the grilled corn with the orange-basil butter and serve immediately.


These turned out really great! It was a flavor combination that I had never tried before, and I was pleasantly surprised by how well it worked.

If you don't have an orange or dried basil on hand, try lemon and thyme or cumin and cayenne!

Monday, February 21, 2011

Spinach- and Ricotta-Stuffed Tomatoes

This fortnight's Cookbook Challenge theme is love. I had some ideas for recipes I could do that had some significant meaning to my relationship with my husband, but instead I decided to go with a tomato recipe. Why tomatoes? Because they used to be known as "love apples" in Europe!


I didn't realize at the time that I chose my recipe that there's actually a shortage in tomatoes right now, so I ended up having to halve the recipe because I couldn't afford to buy eight tomatoes at $2.69 a pound. Luckily this recipe is really easy to halve, and now I have extra spinach in my freezer that I'll probably put in a quiche.

The recipe is from The Silver Palate Cookbook by Julee Rosso and Sheila Lukins, published in 1982.

8 ripe red tomatoes, the best you can find
salt for draining tomatoes
3 tbsp olive oil
1 cup finely chopped yellow onions
10 ounces frozen spinach, defrosted, drained, and squeezed dry
salt and freshly ground pepper, to taste
nutmeg, to taste
1 cup ricotta cheese
2 egg yolks
1/2 cup toasted pine nuts (see below for toasting instructions)
1/4 cup grated Parmesan cheese, plus additional cheese to top tomatoes
1/2 cup chopped Italian parsley 

To toast pine nuts: Spread them in a single layer on a baking sheet; place in a preheated 400F oven for 5 to 7 minutes. Stir once or twice during baking. Remove immediately when well browned and transfer to a cool plate; otherwise the heat from the baking sheet may cause them to burn.


Wash and dry the tomatoes and cut off their tops with a serrated knife. With the handle end of a small spoon, scrape out seeds and partitions, being careful not to pierce the sides of tomatoes. Salt the cavities and set tomatoes upside down on a paper towel to drain for 30 minutes.
Heat the olive oil in a skillet, add the onions and cook, covered, over low heat until tender and lightly colored, about 25 minutes.
Chop the spinach and add it to the skillet. (Yeah right, as if I didn't buy my spinach pre-chopped.) Combine onions and spinach thoroughly, season to taste with salt, pepper, and nutmeg, and cover. Cook over low heat, stirring occasionally, for 10 minutes. Do not let the mixture scorch.
 Beat ricotta and egg yolks together thoroughly in a mixing bowl. Add spinach mixture, pine nuts, 1/4 cup of the Parmesan, and the parsley, and season to taste with salt and pepper.

Gently blot tomato cavities dry with a paper towel and spoon an equal share of the spinach mixture into each one. Top each tomato with an additional sprinkle of Parmesan.
Arrange tomatoes in a shallow baking dish and set in the upper third of a preheated 350F oven. Bake until tops are well browned and filling is hot and bubbly, about 20 minutes. Serve immediately.

Note:  I don't know if it was because my baking dish wasn't very shallow or if they simply needed more time, but I didn't think the tomatoes baked well enough in only 20 minutes. I was in a hurry (hence the lack of photos) so I didn't try to bake them any longer, but when I reheated a couple of them the following day in the oven, they came out much better. Just make sure the Parmesan on top is definitely browned, and the skin of the tomatoes is fairly wrinkly, and they should be perfect. Either way, the filling tastes fantastic.

Wednesday, February 9, 2011

Rosemary Raisin Bread

From Better Homes and Gardens: Classic Recipes, published in 2005. This is one of the very few cookbooks I have that was published in the past decade, and it's also one of my very favorites. This will not be the last time I post a recipe from it!

This rosemary raisin bread is the perfect bread to have with breakfast (or as breakfast if you only have time to grab something small). It's savory-sweet, is good toasted or not, and it goes well with other breakfast foods such as eggs.

The recipe makes two loaves, but I always halve the recipe because I only own one loaf pan. It's easy to halve, except it might be a little tricky to cut an egg yolk in half! I suggest getting a little custard cup or condiment bowl and putting the yolk in there, then taking a spoon to scoop out half of it when you need to put it in the batter, and put the other half aside until you need it for the glaze.

6 to 6 1/2 cups all-purpose flour
2 packages active dry yeast
2 1/2 cups milk
3 tbsp sugar
2 tbsp butter
2 tsp salt
1 egg yolk
1 1/2 cups golden or dark raisins
4 tsp dried rosemary
1 egg yolk, beaten
1 tbsp milk

Prep: 30 minutes
Rise: 75 minutes
Bake: 40 minutes

In a very large mixing bowl stir together 3 cups of the flour and the yeast; set aside. In a medium saucepan heat and stir the 2 1/2 cups milk, the sugar, butter, and salt until warm (120 to 130F) and butter is almost melted. Add warm milk mixture to flour mixture. Add 1 egg yolk; stir until combined.

Beat with an electric mixer on low speed for 30 seconds, scraping the side of the bowl constantly. Beat mixture on high speed for 3 minutes more. Sprinkle raisins and rosemary onto flour mixture. 
Using a wooden spoon, stir in as much of the remaining flour as you can.

Turn dough out onto a lightly floured surface. Knead in enough of the remaining flour to make a moderately stiff dough that is smooth and elastic, about 6 to 8 minutes total. Shape dough into a ball. Place dough in a lightly greased bowl; turn once to grease the surface. Cover and let rise in a warm place until double in size (about 45 to 60 minutes).
Punch dough down. Turn out onto a lightly floured surface. Divide dough in half. Cover and let rest for 10 minutes. Lightly grease two 8x4x2-inch or 9x5x3-inch loaf pans. Shape each half of the dough into a loaf. Place in prepared pans. Cover and let rise in a warm place until nearly double in size (30 to 40 minutes).
Meanwhile, preheat oven to 375F. For the glaze, combine the remaining egg yolk and milk; brush lightly onto tops of risen dough. Using a serrated knife, make a long shallow cut down the length of dough in each pan.
Bake about 40 minutes or until the loaf is golden brown and crusty. The bread should sound hollow when tapped.Cover loosely with foil during the last 10 minutes of baking to prevent overbrowning, if necessary.
Loosen bread and remove from pans immediately. Cool on wire racks.


Friday, February 4, 2011

Spicy Fettuccine with Red Peppers & Mushrooms


This fortnight's Cookbook Challenge theme is rice/noodles. I decided to go with a pasta dish from 101 Meatless Family Dishes by John Ettinger, published in 1995. Despite the cheesy cover photo, it's actually a really good cookbook. Most vegetarian cookbooks focus too much on tofu and weird products that you can only find at health food stores, whereas this cookbook just has recipes that are delicious and full of vegetable-y goodness. This pasta is just as good as it sounds and looks, if not better.
1 pound fettuccine
4 tbsp extra-virgin olive oil
1/2 medium onion, chopped
3 cloves garlic, minced
1/8 tsp red pepper flakes, or to taste
1/8 tsp cayenne pepper
1 tsp chopped fresh oregano or 1/2 tsp dried
3 tomatoes, peeled and chopped with juice or 1 can (28 ounces) with juice
2 tbsp minced fresh Italian parsley
1 bell pepper, seeded and julienned
4 to 5 mushrooms, sliced
grated Parmesan cheese (optional)   

Cook fettuccine according to package directions, drain.
Combine 2 tablespoons olive oil, onion, garlic, red pepper flakes, cayenne and oregano in a saucepan and saute 6 minutes.

Add tomatoes and bring to a boil. Reduce heat and simmer 20 minutes, stirring occasionally, then stir in parsley.
 Meanwhile, heat remaining 2 tablespoons olive oil in a skillet and saute pepper and mushrooms until just softened, 5 to 7 minutes.

Toss pasta with pepper mixture, then with the sauce. Serve with Parmesan if desired.